Friday, September 7, 2012

Fine Semolina and Oats Ladoo

Tried and tasted by Nivedita
Hi All,
A healthy and tasty Ladoo. And the easiest also. 
These were very common in our house during my childhood. Usually fresh coconut is also added in this but I like it the plain. And as we know the Oats now, I have tried adding the Oats powder. I never miss any chance to add Oats in my food preparation. 

To make 8(big) or 10(small) ladoos
Ingredients:
Fine Semolina (Bombay rawa) - 1 cup
Oats powder - 1/4 cup(can add more and reduce the qty of rawa)
Sugar - 3/4 cup
Water - 1/2 cup
Ghee - 1 tsp
Cardamom powder - 1 tsp
Almonds and cashew nut powder - 2 tbsp
OR 
Add whole cashew nuts(I used the powder as my younger daughter never likes dry fruits to eat directly.)


Method:
  • Roast the semolina and oats powder till you get nice aroma. This is must as it allows the ladoos to become softer.
  • Transfer into a wide plate and allow to cool.
  • While roasting the rawa, keep the sugar and water to boil.
  • Allow it to boil till you get one thread consistency. It may take almost 15 minutes.
  • Once the syrup is ready, remove from the heat and allow it to be warm.(This is very IMPORTANT)or else you will end up with making Semolina halwa :-)
  • Add nuts powder, cardamom and ghee to the semolina and oats powder. Mix well.

Now,
  • Slowly spread the half of the  syrup to the semolina mix. Mix well and keep it aside for 2 minutes.Try making the ladoos. If not possible, add some more syrup and mix well. Take little amount of the mixture and try to make into ladoos. This time you should get it. Repeat with the remained mix. 
  • Keep in a plate and allow to cool. 
  • Store in a dry place. You can keep it for a week also.


 Sending it again to Jagruti's event,


Keep Smiling,

Wednesday, September 5, 2012

Rice flour and Oats Porridge

Tried and tasted by Nivedita
Hi All,
I am blessed with the kids who are not very fussy about the food. The little one is little choosy but always prefers the good food. Both are not much into junk food.
Everyday she should be ready by 7:20 in the morning, I should be always ready with her breakfast before 6:30. Usually I ask her what she would like to have in the morning for breakfast and will make according to that. Am I giving too much choice to her!! But, I feel the breakfast is the first food in the morning and I want her to have it full and enjoy it too. Anyways, her lunch is always my choice so I am not worried about the strict laws.
Coming to today's recipe, my younger one loves this! Porridge :-), I prepare porridge with fine semolina, oats, rice flour, ready idly batter.. She loves everything.
Today is the time to share the recipe of Rice flour and oats porridge. Its very easy and I know many of you also make it.
Here is my version,
The recipe is for one cup

Ingredients:
Rice flour - 1/4 cup
Oats or Oats powder- 3 tbsp
Water - 1/4 cup
Milk  - 1/4 cup
Salt to taste
Pepper powder - 1/2 tsp(do not add if giving for younger children)
A pinch of hing or cumin powder(optional)
Ghee - 1 tsp to serve


Method:

  • Take the water and milk in a thick bottomed vessel keep to boil.
  • When it starts boiling, add the rice powder and oats, keep stirring as there is a chance of getting rice flour lumps. 
  • Once it is mixed well, keep on low flame and cook for few more minutes. Keep watching for the water consistency. Add some more water if you feel the porridge has become more thick or its still not cooked.
  • Add hing or cumin powder and pepper powder.
  • Remove from the heat, add salt. Mix well.
  • Serve hot with ghee.
  • Its good for those also who are not keeping well(minus the ghee)
  • Serve with roasted paapad and pickle for dinner.

Sending this to three events. 
The First  one is

Nithu's ongoing event:

 which is started by Jagruti


The Second one is Jagruti's

The third one is Srivalli's 

Keep Smiling,


Friday, August 31, 2012

Stuffed Noodles, 3 ways(reposted)

Tried and tasted by Nivedita
Hi All,
As usual, my last minute entry for the event.  Re posting  the whole post after editing it as the old one is very lengthy. 
Noodles are mom's best friend in the world. Kids love noodles in any form and with anything. My friend Vaishaly and I tried this together. After trying few shapes and the way of cooking we decided to make veggie noodles rolls for the competition.
Interesting thing in this is that the masala mix is the same, only the way of stuffing and cooking is different. Choose the one you want!!


First is the recipe for making masala mix :
For Stuffing:
Mixed Vegetables – 200 gm
(Carrot, Cauliflower florets, Capsicum, Cucumber, Onion, Sweet Corn, Peas, Beans, thinly sliced cabbage)
Garlic – 2 cloves, chopped
Green Chilly - 2 finely chopped
Red chilly flakes – 1tsp
Salt to taste                 
Oil – 1 tbsp

For Sauce:
Tomato Ketchup – ½ cup
White vinegar – ½ tsp
Red Chilly flakes - 1 tsp
Maggi veg.cube – 1
Black pepper powder – ½ tsp
Mix all the ingredients for sauce in a bowl and keep it aside.

For Batter
Corn flour – 3 tbsp
Veg. Stock – 1 cup
Mix it in a bowl and use as required

For the layers:
Flat noodles – 2 packets

(you can mix the normal one also)
Salt to taste
Maggi veg.cube – 1
Corn flour – 1 tbsp
Black pepper powder – ½ tsp
Mozzarella cheese to spread
Butter

Method:


To make Vegetable mix masala:
  • Heat the oil in Microwave safe dish on HIGH for 2 minutes.
  • Add chopped garlic and keep it back in oven on HIGH for a minute.
  • Add mixed vegetables. Sauté it and keep on HIGH for 5minutes. Keep on stirring in between.
  • Add the butter, ready sauce, batter and half the quantity of Veg. stock.
  • Keep back in oven on HIGH for 2 minutes. Stir it after one minute.
  • Check it after 2 minutes. If the mix is slightly thick remove it or keep again for one minute.
  • Cool it.  Divide it into equal quantity for stuffing.
To cook the noodles:
  • Boil the water with salt in a microwave safe dish on HIGH FOR 2 minutes.
  • Add Maggi Veg cube, salt and flat noodles and boil on HIGH for 1 minute.
  • Be careful not to over cook the noodles.  The noodles should be paraboiled.
  • Remove, drain the water and transfer it into colander. Pour cold water on the noodles and drain it properly to remove all the water. Sprinkle powdered Veg cube, corn flour and pepper powder. Mix properly and keep it aside.
To  Make Idly:

Making stuffed noodles idly was my idea and tasted great too. Check out the photos.

  • Take the Microwave safe idly plate. Spread the noodles in a thin layer. 
  • Take a tbsp of masala and keep it in the middle. Spread the mozzarella cheese on the top. Cover it with another thin layer of noodles. Repeat with all the moulds.
  • Keep it covered on HIGH for 3 minutes. Remove and allow it to cool. 
  • Stuffed noodles idly are ready to serve.

To stuff the roll:
  • Divide the noodles according to the size of the roll you want to make.
  • Take one portion; spread it on an even plate to make a round shape.
  • Press with wet hand to combine it.
  • Spread the grated cheese to make a thin layer.
  • Keep the ready vegetable mix in the center.
  • Cover it to give the roll shape. Apply the corn flour batter to close it properly.
  • Brush it with butter.
  • Repeat with other rolls.
  • Brush the microwave safe big plate. Keep the rolls in it.
  • Bake it oh HIGH for 3 minutes. Open and turn the rolls. Brush with butter. Again bake it on HIGH for few more minutes.
  • Allow to cool.
  • Serve with Ketchup or sauce.


Going little oily,
Take the stuffed idly shaped noodles, fry in the hot oil and serve it with ketchup or sauce.

Sending this to Shama's ongoing event,

AND also
Sending it to Jagruti's event


Keep Smiling,

Thursday, August 30, 2012

Rice flour Murukku( akki hittina Chakli)

Tried and tasted by Nivedita
Hi All,
Today, I am here with a snack which is very common, liked by all the age group(only those having full set of strong teeth!!), can be eaten at any time of the day.. Easy to carry, love to share and happy to munch together.
Murukku, Chakli...
Its first time (actually second time in this month) but first time in my life that I dared to try out these mini wonder snacks all alone. And yesss!! I got them perfect in the first attempt(which rarely happens with me).
I do not know why I used to hesitate to prepare these!! may be because whenever my mom tried, either these chaklis came out very soft and got spoiled or I wanted my kids to push me into it..

My younger daughter loves chaklis, and as you know me, I do not like outside food much... I try to try everything at home.. 
Here is the recipe,
Ingredients:
Rice flour - 2 cups
Dalia powder (puthani powder) - 1 cup
Salt to taste
Red chilly powder - 2 tbsp or little more if you want it spicy
Ajwain - 1 tsp
Sesame seeds - 2 tbsp(optional)
Oil - 1 tbsp
Butter - 2 tbsp
warm water - 1/2 cup
more water to prepare the dough
Oil to fry
Murukku maker to press the murukku.

Method:
According to my mother and aunties, The rice should be cleaned, washed, dried and the flour should be done in flour mill. But, do we have all that patience now a days? if we have patience, we do not have time for sure. So I went for the shortcut way(some times shortcut way brings you success!!). I had the rice flour(but again it was done in flour mill, not from the shop).
I kept the rice flour in M/W safe plate for a minute and allowed it to cool before adding other things.

  1. Take the all the ingredients from rice flour till sesame seeds in a big plate.
  2. Mix well.
  3. Add the butter in warm water and keep it for half a minute.
  4. Heat the one tbsp oil and add it to the flour. Add the butter and water.
  5. Mix well to make hard dough. Add some more water if you need.
  6. Keep it ready.
  7. Heat the oil in a wide kadai. Till it gets hot,


Keep few plates ready to put the murukku before putting them in to oil to fry, or I used kitchen tissue papers so that I could spread two murukku on a paper. This will make your work easy and fast. OR if you are expert you can directly put the murukku in a kadai and fry directly.
Take a big ball size of ready flour mix, put in the murukku maker. 
Press slowly, turning the upper knob to get the proper shape. Put one by one in a hot oil and fry till slight brown. Fry in batches. Allow to cool and store in a air tight jars. These can be kept for 15 days also(if remains!! )

Sending this to Nithu's ongoing event:
Event Announcement : Know Your Flour - Rice Flour
 which is started by Jagruti

Keep Smiling,


Friday, August 10, 2012

Fried Potato Cubes

Tried and tasted by Nivedita
Hi All,
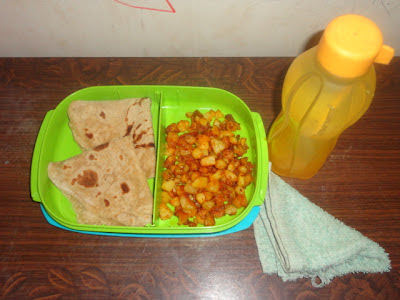
Lunch box :-), I love to cook lunch and pack it  for my kids. This gives little work to my idle brain. I need to be very specific as their school won't allow few foods like Curry or Sambhar (watery), Upma, Eggs, non veg, Poha, bread and chips. My elder daughter loves to take different type of food as she loves to share her lunch with her friends and they love it. And that makes me a proud mother :-). 
Most of the times I pack the different variety of rice for my elder daughter's lunch. But this Potato fry is my daughter's most favorite lunch. Many times she takes only the fry, but I pack the chapati with it without telling her :-) 
A very simple recipe but tasty and good food  for kids.

Ingredients :
Potatoes - 3 big
Salt to taste
Red chilly powder - to taste or 1 tsp
Oil - 2 tbsp

Method :
Wash and peel the potatoes. 
Cut into small cubes.
Heat the oil in a kadai.
Add these potato cubes.
Keep on stirring and frying till the potato gets 3/4th cooked. 
Add salt and chilly powder, mix well and fry till its golden brown.
Remove from the heat and transfer it on a plate.
Allow it to cool and pack it with Soft Chapatis
I tried to bake and grill it in the OTG, but the taste was not that good and it became very dry..


It can be rolled into chapati with some sauce or ketchup and make it a Fried Potato roll to serve it hot. Or it can be eaten just like that.


Keep Smiling, 

Saturday, August 4, 2012

Boondi Chiwda

Tried and tasted by Nivedita
Hi All,
Festivals!!! Coming in a row... The kitchens are filled with aromatic flavors of sweets, namkeens and many more delicious snacks.
Today I am here with the recipe of Boondi Chiwda. Chiwda is a spicy crispy snack which goes well with a cup of tea, a very hot Bisibele Bath(Spicy Veg. and dal rice) or Upma.
The Boondi is prepared with gram flour. Here I have used the ready made packet of boondi. Haldiram's product is available at all the major shops. I used the local product.
I will try to give the home made recipe of Boondi  here soon.
Now, coming to the recipe,


Ingredients :
      Boondi - 250 gm(unsalted)
  1. 1.Oil - 1/4 cup
  2. Mustard seeds - 1 tbsp
  3. Cumin seeds - 1 tbsp
  4. Fresh Curry leaves - few
  5. Pea nuts - 1/4 cup
  6. Garlic - 10 to 12 big cloves, cleaned
  7. Dalia - 1/4 cup
  8. Poppy seeds - 1 tbsp(optional)
  9. Sesame seeds - 1 tbsp(optional)
  10. Dry coconut (thin shavings) - 2 tbsp
  11. Red dry chilly - 6 to 8
  12. Salt to taste
  13. Turmeric powder - 1 tsp
  14. Red chilly powder - 1 tsp
  15. Sugar - 1 tbsp


Keep all the ingredients ready in one place.
TAKE CARE TO ADD THE  INGREDIENTS ONE BY ONE AS I HAVE GIVEN.
Heat oil in a wide and thick bottomed kadai.
Add the mustard seeds, when splutter, add cumin seeds, curry leaves and pea nuts. Fry till the pea nuts are little golden.
Keep on adding other ingredients  till red chilly powder, slowly, keeping on stirring all the time. Once every thing is fried properly, remove from the heat. Add the sugar after few minutes. Allow it to cool.
Add the boondi and mix well. 
Store in a airtight jar.
It can be stored for a week or 10 days.

Keep Smiling,

Tuesday, July 31, 2012

Green chilly fries(Re posting)

Tried and tasted by Nivedita
Hi All,
All time favorite at home. Have with hot rice and dal, have with puran poli or holige or any sweet dish.. Make yogurt poha with it, just add it to the rasam... 
We love these fried chillies and we never forget to make these during summer and preserve it for the whole year.
Re posting the same for the event 

Green chilly fries


I
Coming to this recipe,  these type of green chillies are available only during February and March month. So it is perfect to prepare these in Summer as these chillies need sundry. 


Fresh long green chilly - 1 kilo
Fresh yogurt or curds - 1/2 kilo, adjust less or more as per required
Salt to taste
Hing - 1 tbsp or a pea nut size(crushed) if using hard hing
Long thick needle to slit the chillies

Wash the green chillies and dry with soft towel or cloth to remove any water. Slit all the chillies on one side so that the curd gets mixed.
Transfer the curd in a big plastic or glass bowl. 
Add salt and hing. Mix it well.
Add slit green chillies in to it and with a wooden spatula or bare hands(if you can bear the pain later :-)  ) mix the chillies with curds.
This should be prepared in the morning so that you can keep it to dry. 
Spread a thick cleaned plastic sheet in a place where there is lot of sun rays. Take only the chillies(leave the curds in a bowl itself and keep it covered)and spread these on the plastic sheet. Allow to dry till evening. In the evening, again put the chillies back into curds. Mix it properly and keep it till next morning. Again take only chillies and put to dry like previous day. Repeat it for 3 days. From 4th day, dry the chillies till they are totally dry. This may take 2 days depending on the weather. Once the chillies are dry, the color will also change to brown. 
Store in air tight container (good plastic or glass will be fine ). You can store it for a year also.
When ever required, take the chillies out and fry in hot oil. Use it with rice, chapati as a side dish.


Sending this to Kaveri's on going event "Event Announcement - Guest Hosting EP Series - Fenugreek Leaves and Green Chili in her blog Palakkad Chamayal which is the brain child of   Julie.
Keep Smiling,

Saturday, July 28, 2012

SAMBHAR POWDER(SPICY CURRY POWDER, RE POSTED)

Tried and tasted by Nivedita
Hi All,
The World goes bland without spices.. There is no food without using at least a single spice. Jagruti's idea of having an event especially for introducing these spice powders will help many of us. Each region of the world or you can say each corner of the world has its own flavor or aroma of mixed spices.
So here is my entry for her event, its from the archive posts.

I have just copied and pasted the whole thing here.. and given a new name to it, as the old title is confusing.


Aromatic food makes you feel hungry even after you have finished your food few minutes back!! Each food has its own flavor and taste depending on the spices we use.
South India is famous for its unique spice powder or masala powder or Sambhar powder to be specific. The preparation differs after every 40Km.
I am always hungry to have hot rice with any delicious sambhar!! Here is the sambhar recipe I learnt from one of my friend:
Do these bowl of spices won't look like women at a kitty party!! showing their new jeweleries or saree or accessories???


Giving the quantities for making  powder. You can keep it for a month or a week more. The aroma will go as the days pass. The quantity depends on the size of the cup you take. Its better to make in a little quantity and check the taste.
Ingredients :
Cumin Seeds - 2 cups
Dry coriander seeds - 1 1/2 cups
Curry leaves - 3 cups, if you add more also it tastes good.
Methi or Fenugreek seeds - 1/4 cup
Pepper corns - 1/4 cup
Urad dal or black gram(skinned) - 1/4 cup
Chana Dal or Bengal gram -1/4 cup
Raw rice - 1/4 cup
Dry Red chilly - 20 to 25
Dry coconut - 1 cup
Asafoetida (stoned) or hing - 1 pinch
or Asafoetida powder - 1 tsp
Sesame seeds - 1/2 cup(Optional)
Dry roast each ingredient and keep to cool.
Mix all and make into a fine powder. Store in an airtight jar.
You can use it for Sambhar, Bisibele bath, Cabbage rice or sambhar rice.

Sending this to    's ongoing event which is her brainchild,

Grind Your Cooking Masala !!

Keep Smiling,


Search This Blog

Lijit Ad Wijit

My Shelfari Bookshelf

Shelfari: Book reviews on your book blog