Friday, July 30, 2010

Are you ready? New Event Announcement - "COOK AND CLICK"

Tried and tasted by Nivedita 
Hi All,
Being a person who eats anything edible, I always look into cooking section in any magazine I open to read. Thats how I had collected the pages from the magazine FRIDAY which comes with GULF NEWS on every Friday. And my friend too had collected the pages from many years. She got it binding in a printing press with thick cover. We both used to try those recipes. Before she left for India, she gave me all the books as the books weighed almost  10 kgs!! I was there for longer time and I too tried many recipes. But!!!!

Before I shifted back to India, by mistake that whole box with my few other study books got misplaced somewhere !! I literally cried when I did not get that box. It was a treasure for me. After that I stopped collecting the recipes.
But when I came back to India, I saw my mother's book rack is  full of recipes which she had collected from old Woman's Era and few Kannada Magazines!

 Till today I have not tried any recipes from those pages as I am swimming in the ocean of recipes. (I can name it THE BLOGGERS OCEAN)

Last week, when I went to my other friend, she gave me few old cook books from which she has tried most of the dishes. The books are old, but have a great collection of recipes. One of you might be having those books in your personal library. 

Now when I was just going through those wonderful recipes, a thought came to me about this event. But I remembered an event from some blogger (I am extremely sorry, I am not getting her blog now) which was same like this. She used to give some recipes and one should prepare it and send it to her with the photo. It was 2 years before when I started my blogging. IF ANY ONE KNOWS ABOUT THIS EVENT OR IF YOU ARE THE ONE WHO HAD THIS EVENT, please let me know.
I want to start this event in a different manner:
Every week I will post 2 recipes , the ingredients and the source magazine (if possible). All you need is to choose one or both(if possible), prepare at home, click and send me only the photos.

IF ALL OF YOU SUPPORT ME WITH THIS EVENT, I AM SURE, IT WILL BE GREAT FUN AND TOGETHER WE CAN LEARN MANY OLD RECIPES.

I WILL WAIT FOR THIS WEEK FOR THAT BLOGGER IF SHE READS THIS AND COMES OUT. I JUST DO NOT WANT TO BE A PLAGIARIST. (I do not fully remember that event and its rules.)
If I come to know about that previous event, then lets see! you are the one to decide!

WAITING FOR YOUR REPLIES. 

Keep Smiling,

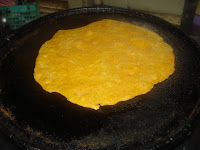
Ajwain flavored flat bread(ಖಾರಾ ಚಪಾತಿ)

Tried and tasted by Nivedita
Hi All,
Are you all wondering what has happened to me? I am going on posting the recipes like as if its end of  my life!!
No, two days left for many events to end, and I want to participate in every event.
Now its time for some Indian flat bread , guessed the event? Check it at the end!
Ajwain is a seed which has strong odor and used in very little quantity. Its very good for indigestion. I used to eat or chew the ajwain and blow it into my kid's naval when ever they had indigestion problem or stomach pain!It works.

Read more  here about Ajwain which is commonly known as carrom seeds also.
Now coming to my recipe, this was common breakfast when we were young! Mom used make it often, but most of the times she used to fry it in hot oil and store it for evening tea or while travelling.
Being a health conscious person I make only chapatis and eat. My elder daughter loves it.
Ingredients :
Wheat flour - 2 cups
Whole grain flour - 1/2 cup(if available)
Gram flour - 2 tbsp
Salt to taste
Turmeric powder a pinch
Red chilly powder - 1 to 2 tsp
Ajwain seeds - 1tsp, crushed
Oil - 1 tbsp

Water to make dough
Oil to roast chapatis
Ghee to spread on chapatis


Take all the ingredients except water in a big bowl or plate. Add water to make smooth dough.

Keep the dough for half an hour.
Divide the dough in to small balls.

Roll into desired size with medium thickness.


Roast the chapatis both the sides.

Remove and spread 1 tsp of  ghee. It keeps the chapati soft. And good for kids.
Repeat with other dough.
Perfect for lunch box for kids.
Sending this to 

Announcing Global Kadai - Indian flavoured flatbreads ! by Sandhya of Sandhya's Kitchen

Providing the link back to Cilantro's page as per the rule.

AND


image
Keep Smiling,

Thursday, July 29, 2010

Masala Paapad (Microwave)

Tried and tasted by Nivedita 
Hi All,
Are you wondering why am I posting so easy recipe? Because its the favorite snack of my family. We love it any time. Earlier I used to fry the paapad in the oil or used to roast it on tawa or direct flame. But the fried paapad is not good for health and the roasted on tawa is not that tastier. Then I switched to Microwave. 
When ever we go out to have food in restaruants, we always order this one. But now a days often I make it at home. The advantage of making it at home is you can try different combinations in masala. 
Going to the recipe,

Paapad - 2 big size (I use Lizzat urad dal paapad, but the choice is yours)
Oil - 1 tsp or 
Water 
For Masala,
Onion - 1 small, finely chopped
Tomato - 1 finely chopped
Carrot - 1 medium, grated
Fresh coriander - 1 tbsp finely chopped
Lime juice - 1 tsp
Sugar - 1 tsp
Salt to taste
Mix all together and keep aside.
Chilly powder - to sprinkle on paapad

Brush the paapad with oil or water,(choice is yours) Both tastes different but good.
Keep the paapad  in Micro Wave on HIGH for one minute.
Repeat with other paapad.
Keep the paapad on serving plate.
Sprinkle the chilly powder evenly.
Take the ready masala and spread it on paapad. 
Serve immediately.
In my house before I finish spreading on the second paapad, the first one will be over!!
VARIATIONS FOR MASALA:
ADD FINELY CHOPPED CUCUMBER, PARSLEY, SPROUTS, BOILED POTAOTES, SEV..... 
Sending this to 

And 
Srivalli's 365 days of Microwave Cooking! event 

Keep Smiling,


Wednesday, July 28, 2010

Filter Coffee

Tried and tasted by Nivedita
Hi All,
I learnt making tea at the age of 6. But never used to have it. I am good girl. Am I??  I started drinking coffee at very young age. This habit came from my mother. Till today her day starts with a big mug of filter coffee. 
I love a cup of hot coffee from my mother and I missed her coffee all those 12 years I was in UAE. Now I am enjoying it again. 
Coffee is more popular in South India and One must taste the Madras coffee. Idly and coffee is  must for breakfast in South India.
The history of coffee goes at least as far back as the thirteenth century, though coffee's origin remains unclear.The word "coffee" entered English in 1598 via Dutch koffie. This word was created via Turkish kahve, the Turkish pronunciation Arabic qahwa. Read more here .
Coffee beans are roasted and crushed into fine powder. I will not go in detail as the post will too long. But the smell of fresh ground coffee powder takes me to another world. 
After easy availabilty of coffee machines, automatic coffee makers, the use of original coffee filter is very less.
In my house, we still use that traditional South Indian filter. The photo is below. We have the smaller size as we are very few people at home.

We use few brands, one is Panduranga, Green label or the locally made fresh coffee powder. Some times we mix two powders and keep it.
AS Per Niveditha's request, I am just adding lines below the photo(Thanks Niveditha)
STEP1

      Boil 2 cups of water.

Ingredients :
For making filter:
Coffee powder - 2 to 3 tbsp as per the taste you want (more for stronger coffee)
Water - 2 cups
Boil the water and follow the photos to make filter coffee. I think its easier than writing.

STEP 2

Put the coffee powder in the upper part of the filter(where there are holes)
STEP 3

Cover it with the filter cap.
STEP 4

Add the boiling water till the top. and keep it closed for half an hour.
STEP 5

STEP 6

After half an hour the filtered coffee dicoction is ready.

Filter coffee dicoction is ready. Some times, I make and keep it in the fridge for 2 days. 
Now to make 1 big cup of coffee
Coffee dicoction - 1 cup
Sugar - 1 tbsp
Hot or warm milk - 1cup
Put one cup of decoction and sugar in a steel vessel. Boil it. Add milk once it starts boiling. Boil for a minute. 

STEP 7

Take one cup of dicoction and keep it to boil with 1 tsp of sugar.

STEP 8

Boil the milk.

STEP 9

Add one cup of milk to the boiling decoction. And boil for 30 to 45 seconds.
Put (or sieve) into a mug, cup or steel tumbler.
Enjoy the coffee. 


Sending a cup of coffee to 

 Back to basics  held by Jaya of  Desi Soccer Mom 

Keep Smiling,


Fenugreek leaves with Yellow moong (ಮೆಂತ್ಯೆ ಬ್ಯಾಳಿ )

Tried and tasted by Nivedita 
Hi All,
I feel very happy always to post North Karnataka food. Its my dream to reach each corner in North Karnataka and explore the old and unknown recipes. I am sure I will do that once my younger one learns to manage herself.
Here is one easy and common food of North Karnataka. Its healthy too. I love to have this with rice, milk and pickle.
Methi leaves or Fenugreek leaves is called and Menthye pallye in Kannada. There are few types in this. One is with long leaves which is little bitter. Another one is round leaves. This is tastier than the other one.
Ingredients :
Methi leaves - 2 bunch
Yellow moong - 1/2 cup
Onion - 1 big chopped
Garlic - 3 to 4 cloves, finely chopped(skip it if you do not like the garlic)
Green Chilly - 2, finely chopped
Tomato - 1 big, cubed
Dry coriander powder - 1 tsp
Turmeric powder  a pinch
Salt to taste
Mustard seeds - 1/2 tsp
Oil - 1 tbsp
Soak Moong in water for half an hour.
Wash methi leaves in salted water. Drain and chop. 
Heat oil in a kadai. Add mustard seeds. When splutter, add onion and garlic. Fry for a minute. Add soaked dal and tomaoto. Fry for few minutes. 

Add the dry ingredients and chopped leaves. Mix properly. Add 1/4 cup of water. Allow it to cook till the moong is tender and the raw smell of methi leaves is gone. Adjust the seasoning. 

Keep on high flame to remove the water. Its ready to eat. Have with chapati or roti. 
I am going to have it with rice.
 Sunitha's World page

Keep Smiling,

Tuesday, July 27, 2010

Black forest cake in Microwave and an award

Tried and tasted by Nivedita 
Hi All,
I had kept some other recipe to post. But, when today I tried this cake and clicked the photos, I could not wait posting it. Its like a magic. As all of you know, my daughter loves that chocolate cake in the mug. Past 3 days she was behind me to make it but I was avoiding it. I wanted to try some new cake but was hesitating as most of the times my baking is worst and I get disappointed with the out come.
But today I gathered my disappointment and told it to be little positive! And I am here with my black forest cake in microwave. 
This recipe is given by the lady who taught to bake the cake. Its actually heaven when you bake it in an oven. I don't know why am I delaying buying an oven! I really have to feel confident that I can bake anything in that oven. Then only I am going to buy it!
My daughter wanted small round pieces so that she can take it to school tomorrow. And I did not have proper dish to bake it big size. So I tried it in a mug and then in small bowls. When I saw this tiny round cake, I called my princesses  to come with their Barbie dolls. And we three had a birth day party for the Barbie dolls. My kids were jumping with joy.
I have put the Chocolate syrup on the cake to decorate and that was enough for my little one as she does not like the cake.
Coming to the recipe,
PLEASE FOLLOW THE INSTRUCTIONS AND THE QUANTITY.
Ingredients :
All Purpose Flour or Maida -1/4 cup or 40gm
Cocoa Powder - 1/8 cup or 10gm
Sugar - 1/4 cup or 50gm
Eggs - 2
Baking powder - 1/2 tsp
Soda - a pinch
Hot water - 1 tbsp (Add if required, if the batter is thick)
Vanilla essence - 1 tsp


Method :
Whisk egg, sugar and vanilla essence over hot water till custard consistency. (double boiler) This is must to get spongy cake.
Add sieved maida, cocoa powder, baking powder and pinch of soda into it.
Mix cut. Add little hot water if you feel its thick. (I did not put) Mix cut
Put in a greased 6" Microwave safe dish. 
Keep on HIGH  for 2 minutes or less. According to your M/W power. My M/W has 800 power as HIGH.
I baked it for 2 minutes and gave one minute standing time. 
Release sides and allow it to cool. 
Cake is done. Its very spongy, and very light. But tastes little dry as it is baked in M/W.
There is solution for that also.
Make a sugar syrup by adding 1 tbsp sugar in 1/2 cup of water. Cut the cake into 2 equal halves with a thread or knife. 
Soak the cake with the syrup by spreading it carefully with small spoon. Refrigerate for an hour or so.
If you are lucky enough to get whip cream, spread the cream after you put the sugar syrup.
The lovely black forest cake is ready to eat.
DO NOT WAIT AFTER YOU MIX EVERYTHING. 
DO NOT WHISK FOR LONGER TIME
You can bake it in a preheated oven at 180 deg C for 30 minutes.
Now coming to the award,
The award has come from Reshmi of Rasoi . So sweet of her to think about me and passing this to me. I feel happy and feel motivated when I get an honest appreciation from someone. 

And 
Srivalli's 365 days of Microwave Cooking! event 


Keep Smiling,

Monday, July 26, 2010

Avare kalu (Surti paapdi ) Pallye

Tried and tasted by Nivedita
Hi All,
Being a seasonal vegetable, it tastes great after waiting for many months. I have already written more about this in my last post Avare kalu sambhar(Surti papdi sambhar) and Counti...  
Here is the recipe for Dry sabji.
Directly coming to the recipe,
Ingredients :
Surti paapdi or avare kalu - 1 cup, clean, wash and give one boil to make it tender.
Onion - 1 big, cleaned and chopped
Oil - 1tbsp
Curry leaves - few
Mustard seeds - 1/2 tsp
Cumin seeds - 1/2 tsp
Gurellu Chutney(Niger seeds,ಗುರೆಳ್ಳು) powder - 1 tsp(optional, I used here, because its very common in my house)
Salt to taste
Tamarind paste - 1 tsp
Turmeric powder
Fresh coconut grated - 1 tbsp(optional, I did not put)
Fresh coriander to garnish

Method:
Heat  oil in a kadai. 
Add cumin seeds and curry leaves.
Add onion and fry till it changes its color.
Add salt, tamarind paste, turmeric powder and gurellu powder. Fry for a minute.
Add boiled papdi and coconut. Mix well. Adjust the seasoning. Cook for a minute. 
Its ready to eat.
Sending this to 

Keep Smiling,

Aloo Matar Sabji (Peas & Potato masala) - Microwave method

Tried and tasted by Nivedita 
Hi All,
Most of the times, my use of microwave is restricted to warm the food. But now a days I am trying to make new recipes in it, as it is like an extra hand for me. Morning is very busy time, cooking all the things at a time, Make coffee, boil the milk and drinking water, make breakfast, prepare the food for kid's lunch box. My two burner stove is not enough for me. Thats why, when ever I am short of time with many things to cook in short time, I take the help of microwave. There are only few dishes I always love to repeat it. One is Microwave Chocolate Cake (learnt it 2 months back, and its my daughter's favorite) which I repeat once a week. 
The second one is this, Aloo matar sabji which goes very well with Puri and hot chapatis.
Here is the way to make it 100 % in microwave
Ingredients :
Potato - 4 to 6 medium
Onion - 1 big, finely chopped
Fresh or frozen peas - 1/2 cup
Tomato - 1 big, grated
Curry leaves - few
Coconut milk - 1/4 cup(I used ready coconut powder and added it in warm water)
Oil - 1 tsp or you can skip it.
Salt to taste
Red chilly powder - 1 tsp
Turmeric powder - 1/4 tsp
Coriander powder - 1 tsp
Garam masala - 1 tsp (I use MTR product which is mild but gives good aroma)
Fresh coriander to garnish
Wash the potatoes. Prick all over. 
Keep in the microwave on HIGH for 5 minutes or if your M/W has the option to boil the potatoes(I have) cook it with the option on for 5 minutes. Allow it to cool. Peel the skin and cut into cubes.
Cook the peas also in M/W on HIGH for 3 minutes. Keep aside
Take oil in M/W safe bowl  (if using). Keep on HIGH  for a minute. Remove and add onions. Or if not using oil, add the onions directly.
Keep on HIGH for 3 minutes and let the onions fry and change the color. I forgot to take the snap of that.
Next add the tomato and mix it. Cook on HIGH for 3 minute, stir in between. 
Remove it. Add all the dry powders. Cook for half a minute. Now other remaining ingredients except the coriander. Cook on HIGH for 4 to 5 minutes.
Keep it in the M/W for few minutes. 
Open and transfer it into the serving bowl. Garnish with fresh coriander.
Aloo matar sabji is ready to serve.
This makes for 4 to 6 persons.
My daughter loves (me too!) to have it with puri like this :
                                  
Sending this to two events :

And 
 Srivalli's 365 days of Microwave Cooking! event 


Keep Smiling,

Search This Blog

Lijit Ad Wijit

My Shelfari Bookshelf

Shelfari: Book reviews on your book blog