Showing posts with label vegetables. Show all posts

Monday, February 26, 2018

Bisibele Bath Handi with Masala Powder

Tried and tasted by Nivedita
Hi All,
I am  really a very very huge fan of Bisibele Bath. Whenever I visit Bangalore, I eat bisibele bath every day till I am there. Whenever I make at home, it's only me who eats it, as no one likes at home.

But this homemade powder is a hit in my house. I saw my kids and hubby fighting to have it. 
Thanks to Seema for sharing this recipe. 
Please visit her blog mildlyindian.com and the recipe   Bisibele Bath Masala Powder for detailed recipe. 
What I have changed is I added Guntur chilly with byadgi ones. 

To make bisibele bath,
Soak 1cup rice with one cup of mixed daals(toor dal, yellow moong dal, masoor daal) and handful of groundbuts.
Cut the vegetables almost 2 cups (beans, cauliflower, peas, potato and carrot) and keep ready.
Take the soaked rice, dal and all the vegetables in a cooker. Add the double the water and give two whistles on medium flame. 
Cool and open the lid, 
Add 2 tbsptbsp tama paste, 1 TSP haldi, salt to taste, red chilli powder 1tsp, 2tsp jaggery and our main ingredient 3tbsp of bisibele bath masala powder.

Mix well and add some more water to get water consistency. Close the lid and cook on low flame for 10 min(remove the weight). 
Take one tbsp ghee(must).
Heat it, add 1tsp mustard seeds, cashew nuts, handful of curry leaves, dry red chilly and a pinch of hing. 


Add this to the ready rice. Mix well. Serve hot with boondi.


Keep smiling,

Friday, March 28, 2014

VEGETABLE MASALA SANDWICH for PPCS (FOOD REMAKE)

Tried and tasted by Nivedita
Hi All,
PARTY TIME FOLKS. Copying or imitating is easy and legal :-), I am here with a simplest snack of any time of the day. SANDWICH. I think Sandwich is the only food which has most of the variations of filling. You can fill any thing in between those square slices, have it just like that or toast it, roast it... Tastes awesome.


Today I am here with the healthy sandwich. Its VEGETABLE MASALA SANDWICH   which I have copied from my this month's partner Manjula Kanted of http://www.desifiesta.com/
Though I knew it before but was lazy to try it, Thanks to Manjula and Jagruti for giving me this opportunity to try this yummy sandwich. Its easy for those whose kids don't like vegetables.
The filling is a veg masala which we make for Pav bhaji. Make the bhaji thick and fill it in between white, brown or any bread slices.
We had it toasted in a toaster, my hubby had it plane only with butter,
It was really tasty and filling.


I am a good follower and a real copy cat ;-), followed her recipe exactly to the point. Visit her page for detailed recipe.


Keep Smiling,

Wednesday, July 10, 2013

CHINESE SAMOSAS FOR PPCS

Tried and tasted by Nivedita
Hi All,
Its Party time again ladies. I can not wait to see your entries. I am here with a starter this month. The best way to avoid making more quantity of main course!! Starters!! If starters are tasty, then the main course remains behind, Just joking :-)))))
Starters are the main attraction of any party in any season. We Indians are more attached with fried food for starters. Baked or steamed or raw food starters are still not popular in India. I prefer even any salad bar as a starter but I don't want my guests to scold me for giving a raw food. So I am here with a fried starter which is famous in India... Samosas. Who does not like Samosas?? I!! I really don't like those regular big and hard covered samosas. This one food is always last in my menu. But I love the Mini Samosas . And here today I am with Chinese Samosas. Wondering what is this Chinese? I have stuffed the samosas with Chinese style stir fried vegetables. 
Actually to confess, I started making spring rolls, but could not get proper rolls. I was upset, this was second time it went wrong while preparing for the party. Last time also I had prepared Veg Sheekh kabab but went wrong with the clicks. 
This time I thought I will make use of the same ingredients and make something special then got this idea of converting Spring rolls into Samosas 
:-) 
All is well that ends well... Here is my story of Spring rolls to Samosas. 

Ingredients:

For the Cover:
All purpose flour - 1 cup
Corn flour - 1/8 cup
Salt to taste 
Warm water - required to make soft dough.
For the filling:
Cabbage - 1 small or 2 cups, finely chopped into very thin strips(very imp)
Carrot - 1 big, again finely chopped into thing strips
Beans - 12-15, finely cut in to cubes
Sprouted moong - 1/2 cup
Corn - 1/4 cup,(fresh or canned one)
Oil - 2 tbsp
Green Chilly or small bell pepper - 1 finely chopped
Garlic - 3 cloves, finely chopped
Ginger - 1/4", finely chopped
Soy sauce - 2 tbsp
Vinegar - 1 tbsp
Corn flour - 1 tbsp
Salt to taste
Sugar - 1 tsp
Pepper - 1 tsp(if not giving for kids, add some more)

Oil to fry.

Method:
Take all the ingredients for cover except warm water. Slowly add the water to make a very soft dough. (I used my darling Food Processor.) Keep the dough covered with a damp cloth for half an hour at least.
Till then,
Take oil in a pan, when its very hot, 
Add ginger and garlic, fry for few seconds, add beans and sprouts, cook for a minute. Add the carrot, corn and cabbage. Mix well and fry for 2 minutes on high flame. Turn in slow flame.
Add  all the other ingredients slowly one by one, mixing it well after each ingredient.Cook it for few more minutes till the vegetables are cooked but till little crispy.
Keep it aside.
I had kept both in the fridge for two hours(waiting for my kids and hubby to come home)
Take the dough, make small lemon size balls. Roll into small size puri 
(please follow this LINK to give the samosa shape) 
Fill the ready stuff with a small spoon.
Cover it nicely. Repeat with other stuff.
Keep the ready samosas in the fridge for 10 minutes before frying (optional)


Heat oil in a frying kadai.
Fry the samosas in batches. Serve hot with Ketchup. 
Green chutney won't go well with this as the stuffing is having Chinese flavor.

Its lovely and very different. Till you get a first bite in your mouth, your mind will be expecting the potato taste and you are fooled!! 

my spring rolls :-(

This is my entry to 
Jagruti's  event:


Keep Smiling, 

Wednesday, May 11, 2011

Vegetable Kurma

Tried and tasted by Nivedita
Hi All,
Please don't look at the photo, Its not neat. I took the snap when the last bowl was remained. It was a super hit at the party we had in my brother's house. Thanks to my brother again, who arranged belated birthday party for my elder daughter. After thinking full one day about the menu, I decided to make it at home. I was happy about the decision as my Puri Kurma came out just superb. And every one enjoyed it a lot, the heart shaped puris attracted the kids at the party.
Here is the recipe for Kurma, (I forgot to click the puri photos, sorry :-(  )

The recipe was totally new for me(Atleast), as I did not check any blog or any old recipe from my book. It was just another trial(I took a risk of trying new food for such a big party)
Recipe for Kurma (for 25 people)
Vegetalbes needed:
Potato - 1 1/2 kg
Carrot - 200 gm
Beans - 200 gm
Green pea(Fresh) - 100 gm

For Kurma Masala
Onion - 5 big or 6 small
Tomato - 3 big
Ginger and garlic paste - 1 tsp(fresh, made at home)
Whole Garam Masala - 1 tbsp(Cardamom, Clove, cinnamon)
Fresh Coriander and mint - 1/4 bowl
Oil - 1/4 cup
Butter - 1 tsp
Red Chilli powder - 2 tbsp
Dhania powder - 2 tsp
Haldi - 1 tsp
Salt to taste
Tamarind Paste - 2 tbsp
Kitchen King Masala - 1 tsp

Ingredients are more and the preparation takes lot of time.

Method:
  • Boil the potatoes, peel and mash it.
  • Parboil the other vegetables and keep aside.
  • Boil or Microwave the onion till soft.
  • Once cool, add whole garam masala and ginger garlic paste. Grind into fine paste.
  • Puree the tomatoes and keep aside.
  • Get set go for the last step:
  • Heat oil in a big kadai, I used our big cooker.
  • Add the onion paste and fry for few minutes.
  • Once the raw smell goes add the tomato paste. Mix well and fry for 2 more minutes on high flame.
  • Add salt, haldi, dhania powder. Mix well. 
  • Add the boiled vegetables. Mix well. 
  • Add enough water to make it thick gravy. 
  • Cover and cook for 8 to 10 minutes.
  • Adjust the seasoning. Add butter and fresh coriander before serving.

Have it with puri or chapati or bread :-)

Keep Smiling,

Wednesday, April 27, 2011

Grated Vegetable Soup

Tried and tasted by Nivedita
Hi All,
Last week, I went to my cousin's house to stay for 2 days. May be because of change in weather, water, Phalguni fell ill. When I came back I had to rush to the doctor. She had high fever with severe infection. Doctor prescribed antibiotics and told to keep her on liquids.Now it was my testing time, yes!! I get nervous when kids fall sick. I go blank.. 
I wanted to give her something like soup which keeps her full and which is healthy. As usual, without planning, I entered the kitchen to check what I have and what I can do.
I got Carrot, Potato, Cabbage, Beetroot,  Peas. 
That was it, but no time to boil the vegetables as I had to finish before she got up. So thought of grating the vegetables.
Here is the recipe:

Ingredients:

Cabbage :- 1/4 cup
Potato - 1 medium, peeled
Beet root - small, peeled
Carrot - 1 medium, peeled
Baby corn - 1 small
Peas- 8 to 10(you can add more, I just wanted to give colour to the soup)
Corn flour - 1 tbsp
Oil - 1/2 tsp(You can use butter also)
Ginger and garlic - 1/2 tsp, finely chopped
Salt to taste
Pepper powder - a pinch
Lime juice - 1/2 tsp 
Water to make the soup

You can add
Soya sauce - 1 tsp
White vinegar - 1 tsp

Method:
Grate all the vegetables.(Except peas)
Mix cornflour in 1/4 cup water and keep aside
Heat oil or butter in thick bottomed kadai.
When hot, add ginger and garlic, saute till light brown.
Add all the grated vegetables and saute for some time till the raw smell goes(it takes 3 to 5 minutes)
Add 2 cups of water and boil till the vegetables are almost cooked. (It takes 8 to 10 minutes)
Add the salt, pepper powder and cornflour.
Mix well and adjust the seasoning and the thickness of the soup. You can add more water if you feel its very thick.
Boil for  few more minutes for the cornflour to get mixed well.
If you are adding vinegar and soy sauce, its the time.
Remove from the fire and add lime before serving.
Great and healthy soup for any one. ( it was enough for 4 people)
My daughter enjoyed it luckily.
Now she is feeling better. (magic of mamma's soup!!!)

Keep Smiling,

Saturday, March 12, 2011

Chinese Fried Rice(Restaurant STyle)

Tried and tasted by Nivedita
Hi All,
We all four in my family love Chinese food.
The Chinese food  I enjoyed the most and many times was when I was in UAE. I miss Chinese food from UAE!!
Strange right!Hey I love Arabic food too.
Coming to the recipe,
Fried rice is very common in my house, and I learnt to make exactly like restaurant after many trial and error method. Now its on weekly menu in our house. We never get tired of this rice. In UAE, I used to add the chicken to make it Chicken fried rice. But now restricted to only Veg. Fried rice. I have many benefits in this.
My younger daughter who never likes to eat vegetables, love this rice and all the vegetables goes in without any fuss. Its easy for me to make it for the lunch box. My elder daughter's friends love this rice, so I have to pack two boxes and that makes my daughter happy to share it and get compliments for her mother(thats me).

Here is the easiest recipe to enjoy the Chinese food at home. Cutting vegetables is time consuming, most of the times, I cut the vegetables at night(I do not like but, depends on the time available in the morning) and keep ready.
Ingredients:
Cooked and cold rice - 1 big bowl, loosened.
Finely cubed vegetables - 1/2 cup(Carrot and beans)
Fresh or frozen peas - 1/2 cup
Finely Shredded Cabbage - 1/2 cup
Spring onion - few lines, finely chopped OR
Normal onion - 1  small, finely sliced
Green Capsicum - 1 small, finely cubed
OR
I always use,
Green chilly - 1 big, finely cubed
(Me and my daughter are allergic to Capsicum, it gives hyper acidity)
Oil - 1 tbsp(normal or Olive)
Garlic - 4 cloves, finely chopped
Ginger - 1/4", finely chopped
Salt to taste
Cornflour - 1 tbsp
Sugar  - 1 tsp
Dry red chilly powder - 1/4 or 1/8 tsp(just to give color)
Soy Sauce - 1 tbsp
White Vinegar - 1 tbsp
Tomato Ketchup - 1 tbsp

Method:
  1. Para boil the carrot, beans and peas(if using fresh peas) and keep it aside.
  2. Keep everything ready on hand as you should be very quick to add and saute the vegetables.
  3. Heat the oil in a thick bottomed kadai.
  4. When its VERY HOT, add ginger and garlic, saute it for few seconds. 
  5. Now add the onion(if using normal one), fry for half a minute. 
  6. Add, paraboiled vegetables, green chilly(or capsicum if using), shredded cabbage. Saute for a minute.
  7. Add the spring onion at this(if using).
  8. Add the soya sauce, White vinegar and tomato ketchup. Mix well. 
  9. Add the rice, salt,red chilly powder, sugar and cornflour.
  10. Mix well, and cook for few minutes.
  11. Serve hot with Vinegar and chilly sauce.
  12. (Vinegar and Chilly sauce : Take 2 green chilly and chop it very finely. Take 1/2 cup vinegar and put it in a glass or plastic bowl. Add the chopped green chilly. Keep it for 3 to 4 hours before using. You can store it in the fridge for a week also)

I think this is the best recreation by me which tastes same like restaurant. Thats why Sending this to 
Champa's guest hosting event
Which is the original idea of Srivalli.


(Very upset, because I can not upload any new photos for my blog. Two days back, I lost my camera. My many recipe clicks went off! Need to wait to buy one more camera, which is not going to be possible soon.)


Keep Smiling,

Monday, December 20, 2010

Vegetable Sandwich

Tried and tasted by Nivedita
Hi All,
Sandwich!! Who does not like sandwiches?? One can be more creative while making these sandwiches. You can make it healthier by adding healthy ingredients and you can make it junk food by adding some fried food, cheese or butter!!
But I love this combination. Its evergreen and most common sandwich which is prepared all over India. Its more healthier if you use brown bread.
It is easy to make because all the vegetables are easily available at home and not all the vegetables are compulsory.
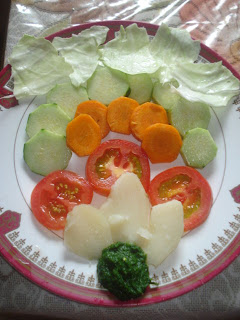
The vegetables you can see it the photo are what I love to have it in my sandwich. Cabbage leaves is optional.
Coming to the recipe:
Ingredients:
Fresh bread - 4(to make two sandwich)
Potato - 1 big, boiled and cut into thick slices
Tomato - 1 big or 2 small, washed, and cut in to round slices.
Cucumber - 1 big,  washed, peeled and cut into thick and round slices
Carrot - 1 big, washed, peeled and cut into thick and round slices.
Cabbage leaves - 1 for each, torn into pieces
Butter - 1 tsp for each sandwich
Green chutney(Pudina or mint leaves chutney): I always keep it in the 
fridge :-)

Fresh coriander - 1 bunch, washed,cleaned and chopped
Mint leaves or Pudina - 1/2 bunch, washed, cleaned and chopped
Green chilly - 1 long
Jeera - 1 tsp
Transfer the above ingredients in a grinder and grind into a fine paste.
Remove it to a bowl. 


  • Arrange all the ingredients in a plate so that it is easy to send these into sandwich.


  • Take 2 slices of bread on a plate.
  • Apply butter,
  • Spread the green chutney,
  • Spread potato slices,
  • Keep all the vegetables one on another to make thick layers.
  • Cover it with another slice.
  • Keep in the toaster or Sandwich maker and cook it till it turns slightly brown. 
  • You do not have toaster or sandwich maker? No problem, you can make these on hot tawa or pan also. Don't want to toast?? Have it just like that.
  • Have it hot with some more green chutney or ketch up or sauce.


I want to dedicate this sandwich to Keri of  SANDWICH 365. I know I am late for doing this. I love her blog and this is just a small thank you to her.

Keep smiling,

Friday, October 29, 2010

Stuffed Lady's Finger with Coconut and Coriander(Food remake)

Tried and tasted by Nivedita
 Hi All,
A delicious, tasty and easy ladyfinger or bhindi ki sabji from Jagruti of Joy of Cooking.
Click here for the recipe:

I enjoyed it with hot chapatis or phulkas.
I am sure you will love it.
Thanks Jagruti for sharing such a lovely and simple recipe.
Keep Smiling,

Sunday, September 12, 2010

Brinjal masala

Tried and tasted by Nivedita
Hi All,
Some times, I don't understand to name the food I prepared. I don't know what name should I give to this food so just given as Brinjal Masala.
I tried this without any plan. But it came out very good. And I loved it with hot rice and pickle.
These long hybrid brinjals are not regular in our place. We get those purple round small and big ones. So when ever I see these, I bring home. I make Sambhar or normal dry sabji with tomato and onion. But this time, I thought of trying something new and I was not sure that what I am going to do. I just opened the spice box and checked what is available.

I  came out with this recipe:

Ingredients :
Brinjal - 3, cut into round slices and kept in the water
Tomato - 1 big, grated
Oil  - 1 tsp
Mustard seeds - 1 tsp
Salt to taste
Turmeric powder - a pinch
Jaggery - 1 tsp
Water - 1/4 cup

Dry roast and powder:
Dry red chilly - 3
Dry coriander seeds - 1 tsp
Sesame seeds - 1 tsp
Dry coconut - 2 tbsp

Heat oil in a kadai.
Add mustard seeds. Once splutter, add tomato and masala powder. Mix well.
Add the brinjal slices. Fry for some time.
Add all other ingredients with 1/4 cup of water. Mix well and cook till the brinjals are soft. It takes very less time(5 to 7 minutes).
Adjust the seasoning.
Have with chapati or rice.

Sending this to
Jay's on going event  
jay Ho Brinjal

And
Akila's 

Keep Smiling,

Friday, September 10, 2010

Grilled garlic and green lady finger

Tried and tasted by Nivedita
Hi All,
Okra, bhindi, lady finger or bendekai, is not everyone's favorite. But there are ways to make those people love this beautiful  vegetable. This grilled okra is one of those. Avery simple recipe but tastes yummy.

I have ON-OFF passion for this vegetable. There are months where I do not bring it home for others also and there are months where I bring every time and try new recipes with these. And now a days, I bring it often because its my daughter's favorite vegetable. But she likes it only if its cut into small size. So when I prepared these I only had to finish it, And she warned me to make it again but with small sized bhindi.
The size depends on your choice : I love to have it like this only.
Lady finger - 500 gm
Oil - 4 tsp
Lime juice - 2 tsp
Salt to taste
Gram flour - 1 tbsp
Sugar - 1 tsp

Make a fine paste of :
Green chillies - 8 to 10
Garlic - 15 flakes
Fresh Coriander - handful

Wash, pat dry and trim the ends. Slit from the center keeping the ends intact.
Mix the fine paste, slat, gram flour, lime juice and sugar in a bowl.
Stuff the okra with this paste.
Brush the drip tray with 2 tsp of oil.
Arrange the okras on a tray. 
Brush with remaining oil.
Grill on 240 degree C for 15 to 20 minutes.
Serve hot with chapati or serve it as a starter.
If you do not have oven,
You can directly shallow fry on tawa till they get crispy.
Sending it to
Priya's BSI-OKRA, where as BSI stands for Blogger Segret Ingredient and is started by Biz.

And 
Kiran's  Veggie/Fruit A Month - OKRA started by Priya .

Keep Smiling,

Sunday, August 29, 2010

MIXED VEGETABLE SAMBAL

Tried and tasted by Nivedita
Hi All,
Here is my entry for the event  "Cook and Click" - 2 for Recipe of "COOK AND CLICK" : MIXED VEGETABLE SAMBAL :


In the book, they have not give the salt to add. I tried without salt also. But it tasted very bland so added little salt to taste. The taste was very good as a starter. 
Try it and send the clicks to my this event.


Keep Smiling,

Wednesday, August 4, 2010

Tawa Fried Paneer Tikka

Tried and tasted by Nivedita
Hi All,
Scroll down to laugh or say Ohhh!Very funny incident happened while making this one.  I wanted to make 100% microwave cooking with paneer. I got a recipe from LG microwave cooking book(I got it when I brought my microwave, 3 years back). The recipe was Hariyali Paneer Tikka.I kept in my draft and was planning to go to the shop to get Paneer. The same day I saw this  recipe!  It tempted me to prepare it the same day. But it was oven grilled dish. I thought let me use the ingredients at least.
Immediately I went to the shop and brought paneer.


Read the ingredients, the steps and the procedure:
Paneer - 500 gm (cut into big cubes)
Capsicum - 1 big, diced 
Tomato - 1 big, cubed
Onion - 1 big, cubed
For Marination
Hung curd - 1 cup( I used normal curds)
Ground mint leaves - 1 tbsp
Fresh Coriander leaves (ground) - 1 tbsp
Green chillies -1, finely chopped (I reduced it to one, in LG Book, they have given 4)
Red chilly powder - 1 tsp(my addition, it was not there in LG recipe)
Garlic paste - 1 tsp
Garam Masala - 1/2 tsp(I used MTR)
Turmeric powder - 1/4 tsp
Salt to taste
Oil - 1 tbsp
Lemon Juice - 1 tbsp
Gram flour - 1 tbsp (My addition)

Procedure
Mix all the ingredients for Marinade in a Microwave safe big and wide bowl. (I had the plastic one which was given by LG People with the M/W.)


Marinate it for 2 hours at least. 


Now the real fun started.
(As per the LG recipe, we need to place the marinated cubes and vegetables in a M/W safe dish  on the high rack and grill for 15 - 20 minutes, till golder brown all the sides)
I transfered the marinated cubes and vegetables in to another safe bowl and kept it on high rack  and chose " Grill" and kept  for 15 minutes. Nothing happened. So I thought I will try with "combo grill". I pressed the option and kept for 15 minutes.

Aftet 5 minutes, what I can see!! The bowl is melting!!! I offed the M/W immediately and took the bowl out. I burnt my finger without realizing it was hot. I transfered the ingredients in to another bowl.
See in the photo what happened to my bowl, in which I used make many things :-(
                               
My dosa pan came to my rescue.  I arranged the cubes in to wooden skewers and kept ready.
I made the pan very hot, brushed some oil on it, and kept the skewers. After few minutes I brushed the cubes with oil and turned upside down. Repeated the process till they were golden brown all the sides.
Paneer tikka was ready to eat.My daughter who does not like paneer so much, she asked me to make again for the dinner :-)
Very easy and yummy tikka without oven, without grill and without without tandoor!!!

Sending this to 

Umm's (of Taste of Pearl City)'s 
Keep Smiling,


Search This Blog

Lijit Ad Wijit

My Shelfari Bookshelf

Shelfari: Book reviews on your book blog