Showing posts with label Desserts. Show all posts

Tuesday, July 27, 2010

Black forest cake in Microwave and an award

Tried and tasted by Nivedita 
Hi All,
I had kept some other recipe to post. But, when today I tried this cake and clicked the photos, I could not wait posting it. Its like a magic. As all of you know, my daughter loves that chocolate cake in the mug. Past 3 days she was behind me to make it but I was avoiding it. I wanted to try some new cake but was hesitating as most of the times my baking is worst and I get disappointed with the out come.
But today I gathered my disappointment and told it to be little positive! And I am here with my black forest cake in microwave. 
This recipe is given by the lady who taught to bake the cake. Its actually heaven when you bake it in an oven. I don't know why am I delaying buying an oven! I really have to feel confident that I can bake anything in that oven. Then only I am going to buy it!
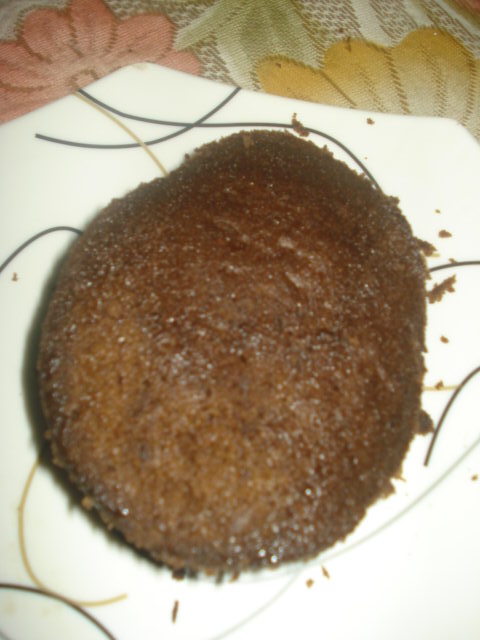
My daughter wanted small round pieces so that she can take it to school tomorrow. And I did not have proper dish to bake it big size. So I tried it in a mug and then in small bowls. When I saw this tiny round cake, I called my princesses  to come with their Barbie dolls. And we three had a birth day party for the Barbie dolls. My kids were jumping with joy.
I have put the Chocolate syrup on the cake to decorate and that was enough for my little one as she does not like the cake.
Coming to the recipe,
PLEASE FOLLOW THE INSTRUCTIONS AND THE QUANTITY.
Ingredients :
All Purpose Flour or Maida -1/4 cup or 40gm
Cocoa Powder - 1/8 cup or 10gm
Sugar - 1/4 cup or 50gm
Eggs - 2
Baking powder - 1/2 tsp
Soda - a pinch
Hot water - 1 tbsp (Add if required, if the batter is thick)
Vanilla essence - 1 tsp


Method :
Whisk egg, sugar and vanilla essence over hot water till custard consistency. (double boiler) This is must to get spongy cake.
Add sieved maida, cocoa powder, baking powder and pinch of soda into it.
Mix cut. Add little hot water if you feel its thick. (I did not put) Mix cut
Put in a greased 6" Microwave safe dish. 
Keep on HIGH  for 2 minutes or less. According to your M/W power. My M/W has 800 power as HIGH.
I baked it for 2 minutes and gave one minute standing time. 
Release sides and allow it to cool. 
Cake is done. Its very spongy, and very light. But tastes little dry as it is baked in M/W.
There is solution for that also.
Make a sugar syrup by adding 1 tbsp sugar in 1/2 cup of water. Cut the cake into 2 equal halves with a thread or knife. 
Soak the cake with the syrup by spreading it carefully with small spoon. Refrigerate for an hour or so.
If you are lucky enough to get whip cream, spread the cream after you put the sugar syrup.
The lovely black forest cake is ready to eat.
DO NOT WAIT AFTER YOU MIX EVERYTHING. 
DO NOT WHISK FOR LONGER TIME
You can bake it in a preheated oven at 180 deg C for 30 minutes.
Now coming to the award,
The award has come from Reshmi of Rasoi . So sweet of her to think about me and passing this to me. I feel happy and feel motivated when I get an honest appreciation from someone. 

And 
Srivalli's 365 days of Microwave Cooking! event 


Keep Smiling,

Saturday, July 24, 2010

Broken wheat(or thick rava) and jaggery Halwa (ಸಜ್ಜಕಾ )

Tried and tasted by Nivedita
Hi All,
One more healthy  halwa from my land, North Karnataka. 
In North Karnataka, Jowar(Sorghum) rotti is a must food in villages. Women make more than 50 rottis each day and its a tiresome job. So, the new moon day or Amavasye is like a festival for them. As there will be more work like special pujas for vehicles, cows, buffaloes, tractors, rotti is skipped from their menu. Instead, they prepare only rice, rasam and this sweet, Broken wheat halwa.It is called as Sajjaka in Kannada. It is prepared using rava or thick semolina, usually smaller in size than bulgur. 
Ingredients :
Broken wheat or rava : 1 cup
Jaggery - 1 1/2 cup, grated or powdered
Ghee - 1/4 cup + 2 tsp
Nut Meg powder - 1tsp
Salt a pinch
Water - 3 cups or more to cook the rava.
Mixed nuts - 1 tbsp

Method :
Fry the rava with 2 tsp of ghee till you get the aroma
Keep water to boil.
Once it starts boiling, add the rava. Cook it for a minute. 
Add jaggery and keep on stirring for a minute
Now add salt and cook till the rava is cooked. 
Heat the ghee in a separate kadai. Fry the nuts.
Add ghee and nuts together to the boiling rava. Cook till it starts leaving the edges. 
Transfer it into a bowl and serve it with pickle and paapad. 
This can be used to make polis, called as sajjakada holige.
This is going to my event  

Keep Smiling,

Thursday, July 22, 2010

Green gram halwa

Tried and tasted by Nivedita
Hi All,
I am really an absent minded person. I thought last date for event is July 31st!! Suddenly I saw it now that I have set it as July 25th!!!
Here is my one more try on halwa. It is not very delicious but a very healthy as I have used Green gram flour to make it.
Green gram flour is common in my house. We prepare rotti, thali peeth, laddus and jhunka or pitla or Curry. I use it in making dosas. But I have never tries the halwa with this. So thought of giving it a try. I loved the taste. But you are not used of the smell of green gram you may not like it. I think its good for kids as its healthy one.
I tried in with a very little quantity as I was not sure about the taste.
Giving the recipe :
Green gram flour - 1/4 cup
Sugar - 1/2 cup
Cardamom powder - 1 tsp
Ghee - 2 tbsp+ 1 tsp
Cashew nuts - 1 tbps, chopped
Salt pinch or less
Water - 1 cup
Take the gram flour in a microwave safe dish and keep on HIGH for 30 seconds.(I tried to roast it directly in tawa on heat, it got burnt)
Keep it aside.
Heat ghee in a pan and fry the cashew nuts. keep aside.
Take water and sugar in a thick bottomed vessel and keep it to boil. When starts boiling, add the gram flour. Here, you should be quick to stir it continuously otherwise lumps will be formed and its difficult to remove the lumps later.
OR
Take little cold water, put the flour in it and mix it properly to remove lumps. Add this to boiling water.
Keep on stirring. Add cardamom powder. Add 1 tsp of ghee. Cook it for few minutes without leaving it. It will start leaving the sides. Off the heat, add fried nuts with ghee. Mix it and allow it to cool. Halwa is ready to eat.
Keep Smiling,

Monday, July 5, 2010

Ginna (First Milk Halwa)

Tried and tasted by Nivedita
Hi All,
Are you thinking that what is this First milk? This is the first milk taken from cow just after the delivery and normally it is known as Colostrum. While browsing for more information, I got this link, where it says, this colostrum helps the human immune system tackleviruses, including HIV and H1N1.

During my childhood, milkman used to supply the milk. There were no packet milk. Milkmen used to bring the milk in big aluminium cans or in bottles.  And when ever there was any cow to deliver, we used to wait for this first milk.  Mom used to prepare this Ginna from that milk. 
But when I came to know that how much important it is for a calf to have the colostrum, I (at least) stopped having ginna.  I felt bad for the calf! 
Even for human babies, mother's first milk is very important to develop the immune system.
But, it is not advisable for a pregnant woman as this is considered as heat food or which produces heat in the body.
Last week, my mother's friend bought this ginna for us! And I could not wait taking pictures. I think I tasted it after 25 years!
Here is the  recipe from my mom,
Colostrum - 1 litre
Powdered or grated Jaggery - 250 gm  or according to your taste
Cardamom powder - 1 tsp
 The milk should be used as soon as possible otherwise you will not get the halwa texture, it will become water like payasam.
Add the milk and jaggery in a cooker vessel.  Mix it till the jaggery is dissolved.  Add cardamom powder.
Check for the sweetness. If less add more.
Keep it in a cooker and give 2 whistles. Allow it to cool.
Remove the vessel. Cut the cooked halwa into desired shapes. 
If the milk is one day old,  repeat the same thing but cook it outside in a vessel by stirring it often.  You will get watery ginna, but that also tastes good. We used to have it with puri or chapati.
Sending this to my event : 


Keep Smiling,

Saturday, June 26, 2010

Banana Peel Halwa

Tried and tasted by Nivedita
Hi All,
Today I am hitting(not killing) 2 birds with one stone!!! Here is the recipe for two events!

Banana is a favorite fruit of everyone, including God! Banana is the first fruit we offer to God in any Puja. Banana is a rich source of potassium and fibres. I am Not going into the details, as I am using only the peel here. But even the peel is as good as the whole banana.
We get different variety of bananas.I usually use the small or Elaichi bananas. Here in this recipe also, I have used eliachi banana peel. You can use any variety available to you.

Here goes the recipe to make a small cup of halwa. You can increase the quantity to make it more. Only to take care is the quantity of sugar and to be very quick in making or else the peels will turn into black and halwa also turns brown.
Banana peel - 4 to 6, depends on the size of banana 
Sugar - 3 tbsp or less 
(depending on the sweetness of banana and your taste)
Ghee - 2 tbsp
Cashew nuts - 4 to 6
Cardamom - 1/8th tsp
Milk powder - 1/2 tsp(optional), 
I was not sure about the taste of the boiled peel, so thought of adding little of milk powder.  I think it tastes fine without milk powder also. Let me try next time. And I will let you know about the taste. 
Wash and clean the bananas properly. Peel the banana, peel the skins. Clean the ends and keep in water for few minutes. Remove it and clean once again with clean cloth to remove any dirt if in case.
Put the peel in a bowl. Add water just to cover the peel and boil for 5 minutes or till the skin becomes tender. Remove and keep to cool.
Puree it.
Heat 1 tbsp ghee and fry the cashew nuts. Keep aside.
Add Sugar and keep it to boil. Keep on stirring. Once the sugar melts, add the puree,milk powder, cardamom powder and ghee. 
Once it starts leaving the sides, add one more tbsp of ghee. Remove it from fire. 
Keep it to cool.
Banana peel halwa is ready to eat. It really tastes good and I think it is good for toddlers!! Am I right???

Sending this to,
 1.the event hosted by Nithu at Nithu's Kitchen on 


 and


Keep Smiling,

Monday, June 21, 2010

Carrot and Orange Halwa

Tried and tasted by Nivedita 
Hi All,
I think today we can celebrate "Halwa Day"!!! There are 5 recipes in FB from my blogger friends in one day!!! Here is mine too!!

Actually, I was thinking to do something different with carrot as I wanted to participate in PJ's on going event. Even though I have few recipes in my draft, they are usual ones and are spicy foods.I thought of making some sweet with Carrot and could not think anything else other than this Halwa. But Carrot halwa is a very common sweet. There are many methods to make a simple carrot halwa. And I thought of giving it a twist by adding Orange to it. 
First, I was not sure how it will come out!!! As I never cooked orange directly on heat! I started with little hesitation.
I thought of the ingredients : the normal things which we use for other halwas.
And here it is :
Carrot - 1 big
Washed, peeled, cubed and put into a blender to take the juice. Seive the juice and keep the pulp aside.My juicer is under repair, so these many steps I followed. You can make the juice using juicer.
Carrot pulp - which remained after the juice is sieved.
Orange - 1 big, Take out the juice.
Now measure the juices.
I got half cup juice from both.
Sugar - 1/4 cup or little more if Orange is sour. 
Ghee - 1 tsp
Crushed Almonds and cashew nuts - 1 tbsp
Cornflour - 1/2 tsp to 1 tsp as per the texture of halwa
Salt a pinch
Cinnamon powder - 1 tsp
ACTUALLY I WANTED TO USE ONLY JUICE AND MORE CORNFLOUR. BUT THEN I THOUGHT WHY TO WASTE THE CARROT PULP OR EXTRACT. May be next time I will try only with juice and cornflour and check.
Now, Mix both the juices and pour in a thick bottomed kadai on a heat. When it starts boiling add sugar and carrot extract. Stir and allow it to boil till it thickens. It may take 15 minutes. Now add cornflour and salt. Add cinnamon powder and Crushed dry fruits. Cook till it starts leaving its sides. Transfer it in to a greased plate and allow it set. 

                               
Carrot and Orange Halwa it ready to eat! Have it hot or chilled!!
Sending this to PJ's ongoing event "Vegetable Marathon"

                                                  
Sending it to 
                                                     
Keep Smiling,

Sunday, June 13, 2010

Microwave Chocolate Cake and the saga continues!!!

Tried and tasted by Nivedita 
Hi All,
One more cake from my Microwave. It has become a passion for me to try more cake recipes. And I can not wait till my new oven arrives. Now a days when ever I am in front of the computer I browse for Microwave cakes. And then I got this recipe from Jaishree  of  Ruchi  which she posted on June 9th. She also got the recipe from  here. But in this site, she has used Cake flour. And I think Cake flour is self raising flour. Being not sure about that, I decided to add baking powder. Some of the comments in the site also mentioned about the baking powder. So I came out with my recipe, and the out come was just delicious. If I had whipped cream and icing sugar with me, I would have made this into black forest cake!!! It was that tasty, fluffy and spongy!! Jaishree made egg less cake but I decided to go with the original recipe and used egg.
Thanks Jaishree for this wonderful recipe.
Lets go to the recipe,
Ingredients :
All Purpose flour or Maida - 4 tbsp
Sugar - 4 tbsp
Unsweetened Cocoa powder - 2 tbsp
Egg - 1
Milk - 3 tbsp
Oil - 3 tbsp (any edible oil is fine, I used the normal sunflower oil.)
Baking Powder - 1 pinch
Vanilla Essence - 1 tsp
To make syrrup
Sugar - 2 tsp
Warm Water or Milk - 1 tbsp
Sieve APF, Cocoa powder and baking powder in a bowl. Mix egg, milk, oil, Essence and sugar in a bowl. Mix well with egg beater or with a fork.  Add the sieved flour and mix well till everything gets mixed and you will get one flow batter. It takes 2 to 3 minutes. If you use hand mixer, you need one minute. But I used egg beater.
Grease a mug or any Microwave safe bowl and dust it with APF. Pour the batter into it. You can use the normal big coffee mug. I did not had big one so I used the bowl which came free with Cornflakes! 
But again make sure, that the batter should fill only 3/4 th of your bowl, neither less nor more!!!
Bake it exactly for 2 minutes.
Here it is :
    
                          My camera plays with me!! So the cake looks different in photos!! 
The Cake is ready to eat with hot cup of coffee or tea!!! It tastes great with both. One of my favorite snack!!
Now to give it more taste :
Keep it to cool for half an hour or till it is cold.
Slice the cake in the middle.


Dissolve the sugar in  warm water or milk and make the syrup ready.
On one side slowly spread this syrup with a spoon to make the cake moist and soft. Take care not to put more otherwise cake will break into pieces and the syrup will start flowing out.
Then take chocolate syrup  and spread it the same way you did with sugar syrup. If you do not have syrup and have chocolate brick, melt it in a double boiler or microwave and use it. 
Keep the other side on it and close the cake. Keep it in the fridge for sometime. Take it out and cut into slices before serving. 
Again you can use some ice cream, or more chocolate syrup or caramel or Fresh cream or anything you wish to have!!!
And again, actually I thought our maid broke all my coffee mugs! But I got two mugs in my cupboard. My daughter was asking me to make the cake again and this time she wanted coffee cake. I thought of trying the coffee cake in the mug. Same ingredients except the cocoa powder. I used to 1 1/2 teaspoon Coffee powder and 1/2 teaspoon cocoa powder. 
This too came out toooo good. Enjoy the photos :


Keep Smiling,

Microwave Egg Less Coffee Cake and the sequel .....

Tried and tasted by Nivedita 
Hi All,
After I learnt baking the cake, I was wondering when will I start the baking as still I need to buy a oven that bakes the cake, bread and other stuff. 
Then I got this recipe from Divya, to bake the cake in Microwave.First, I did not believe that, one can bake the cake in Microwave!!! I could not wait to try this one!! and here it came the cake out of my Microwave.
It is a COFFEE CAKE! and I enjoyed the taste of coffee in each byte.


Here is the link : Coffee cake from Divya of  Dil Se..  Thank you Divya for such a wonderful recipe.
And the recipe in my blog :: First time, I followed exactly the way she has told with only adding more milk.
But Next time I tried adding 1 tsp coffee powder and one tsp cocoa powder and changed the way of mixing it and the baking time. Check out my version.
All Purpose flour or Maida - 1/2 cup
Sugar - 1/4 cup 
(But when I made it second time, I felt I should put some more sugar, as the cake was not so sweet)
So I added 1 tsp more sugar 
Baking powder - 1 pinch
Coffee powder - 2 tsp
(I used Nescafe)
(or, coffee powder - 1 tsp and Cocoa powder - 1tsp)
Salt - 1 pinch
Milk - 7 tbsp
(Divya has used 5 tbsp)
Oil - 1 tsp
Sieve all the dry flour in a bowl.  Add sugar  into it. Add all other ingredients and mix well until it blends well and sugar dissolves fully. You can use egg beater or hand mixer. With egg beater it takes more time.
Grease the Microwave safe bowl and dust it with maida. 
Pour the mix from the middle of the bowl to get even spread. 
YOU CAN USE ANY SIZE, ONLY MAKE SURE THAT THE MIX SHOULD BE 3/4TH OF THE BOWL.
Microwave at full power for 2 minutes. It depends on your Microwave power. Just observe the cake after one minute. If you feel its come up, open and check it with fork or a needle. Or even you can check it with pressing very gently on the cake. If you palm comes out clean and you feel the cake gets its shape back when you remove the hand, then it is done. 
Enjoy the cake with your choice of  decoration or filling!!!
Wait for my next cake recipe!!
Here is the photo of my next cake.....
I hope you all will wait to grab a piece of cake from this photo!!! 
 
Sending this to the event announcing-tried-and-tasted-event
by versatilekitchen.blogspot.com which is the brain child of  Zlamushka.

Keep Smiling, 

Search This Blog

Lijit Ad Wijit

My Shelfari Bookshelf

Shelfari: Book reviews on your book blog