Thursday, July 7, 2011

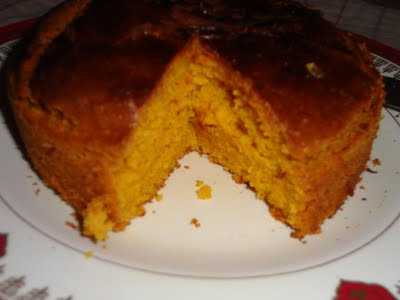
Banana & Carrot Eggless Cake in Cooker (Food Remake)

Tried and tasted by Nivedita
Hi All,
My last entry to the event.. When I did not had oven, I always wondered how to bake a cake.. I knew my mom used to bake the cake in the cooker before she got her oven. But many people told not to bake in the cooker as we use sand in it and it spoils the cooker. I was scared and was not ready to loose a cooker :-))))
Then I got the recipe to bake a cake in a cooker(after I got my two ovens in the kitchen, life is like that always, Bhagwan deta hai toh chappar phadke deta hai :-))))))
Here sanjeeta kk  has used the water and separator as the base and aluminium to cover the cake, She has mentioned it as bread, but personally when I tasted, it was soft and spongy like cake. So I thought of labeling it as Cake. I hope she won't mind.
The carrot and banana combination is a hit here.
click Banana & Carrot Eggless Bread    for detailed recipe. I am not giving the whole recipe here as Its a last minute entry to the event and I can not trust my internet connection.  


Sending it to the ongoing event 
Which is started by ME.

Celebrate Sweets - Cakes


Thanks everyone for visiting this week to enjoy the cakes in my place. 

Keep Smiling,

Cakes(Re Mixed and Re posting)

Tried and tasted by Nivedita
Hi All,
These are few cakes from my archived posts..

Black forest cake in Microwave: My daughters and me had a very good time with these mini cakes :-)

Microwave Chocolate Cake :This became regular in my menu after I learnt to bake it.. Its amazing, super fast cake for any occasion


Microwave Egg Less Coffee Cake:-my first ever bake cake:-)))))))), I loved each bite of this and again when I tried this with coffee powder it was just yumm...


Forgot to add one more cake which is my daughter's favorite again and I had prepared this cake for my younger daughter's birthday to give in her school.


Eggless Chocolate Cake (Food Remake)


Sending it to the ongoing event 
Which is started by ME.

Celebrate Sweets - Cakes

Keep Smiling,

Tuesday, July 5, 2011

Jamoon Fruit Juice -Two ways

Tried and tasted by Nivedita
Hi All,
Jamoon fruit brings many sweet memories in my mind.. These fruits are seasonal and we used to wait for it. During school days, we used to run to the houses where these trees were grown. House people enjoying their afternoon nap were never disturbed till one stone fell on their roof or window glass :-). And then there were few old ladies carrying these jamoon fruits in their round baskets and selling it for 10 Paises. I always love the color of these fruits.

This season, my daughter enjoyed these fruits. When I saw the event "Food palette series purple", the idea struck me to make juice with it. But I was not sure whether I will get the time to do it before July 5th. And I could do it today afternoon. But again my problem was the internet connection which was playing hide and seek with me. Luckily its working now and I hope it will be there till I finish the post and publish it  :-) (I never pray to God for anything else than this broadband service :-)), seriously, God is more kind than this service :-)))  )
Coming to the recipe,

Very easy to make and very soothing juice.
Jamoon fruit has many health benefits. Its rich in Vitamin A, Vitamin C and Iron. Its very good for the people who has diabetes. Read Here for more information.


Ingredients (for making 2 glasses)
Jamoon fruits - 20(big)
Drinking Water - 1 cup

Keep the fruits in water for some time. Clean and put it into a vessel. Add the water and allow one boil. Let it cool. Mash with the hands, remove seeds. Sieve in a serving cup. The basic juice is ready which tastes very raw and bitter. 

To make salty juice :
Add a pinch of salt, Crushed mint and white pepper powder. Mix well. Serve chilled or add few ice cubes if you want to serve immediately.

To make Sweet juice :
Add 1 to 2 tsp Sugar, half a pinch of salt. Mix well. Serve chilled. 


Sending these two juices to the event  by Akheela

Keep Smiling,


Sunday, July 3, 2011

Basic Egg Less Sponge Cake(Food Remake)

Tried and tasted by Nivedita
Hi All,
One more cake in my blog. I hope you all are not getting bored with my daily cake recipes!!! I was waiting for these recipes and photos for long time to publish.,
I just fell in love with this cake. I never imagined that an egg less cake will be so soft, spongy and the tastiest at the same time :-))), This is the perfect cake for the beginners and for those who do not take egg but wants to eat their cake too.
I have baked this cake many times. And every time I have clicked the photos. Here are few photos.(I am not getting few more in my folders :-( , too many folders with lot of photos)
Coming to the recipe for this cake, I followed recipes from two people. Both the recipes are same. 
One is Madhuri of CookCurryNook : Basic Eggless Sponge Loaf Cake
And the other one is
Sailu of Sailu's Kitchen : Basic Eggless Cake (Using Curd)
Thank you both for so lovely recipe.

Here goes the recipe:
Ingredients:
APF -  1 1/2 cups
Fresh Yogurt - 1 cup
Sugar - 3/4 cup
Baking Soda - 1/2 tsp
Baking powder - 1 1/4 tsp
Vegetable oil (Refined oil) - 1/ 2 cup
Vanilla essence - 1 tsp

Method :
Preheat the oven for 10 minutes.
Cream the sugar and yogurt till the sugar melts.
Add BP and BS. Mix well and keep aside for 3 to 5minutes till the bubbles appear.
Add the vegetable oil and essence. Mix well.
Add the sieved APF and mix well but slowly and little at a time ( 2 tbsp at a time)
Transfer the mix into the 6" pan. 
Slowly pat the pan on the floor to remove any air. 
Bake it at 200 degree Centigrade for 10 minutes.
Then reduce the temperature to 175 degree and bake for 20 - 25 minutes.
Allow it to cool and turn it on the decorating plate after some time


Enjoy this tastiest cake with a cup of tea or coffee. I love this combination. Perfect for tea time :-)))

Sending it to the ongoing event 
Which is started by ME.

Celebrate Sweets - Cakes


Keep Smiling,

Black Forest Cake

Tried and tasted by Nivedita
Hi All,
This week, My blog is celebrating the CAKE WEEK. The reason is again the event. As I got stuck in the house work, I could not post regularly and my cake photos left behind. Now is the time for me to post all the cakes.
Today is the day for Black forest cake, which is my favorite... everyone's favorite in my house. And who does not like this one?
And when it comes to baking, I am a very good copycat.. I always follow the recipe from other blogs. But this time it was the recipe which I learnt in my baking class. I have collected many more versions of Black forest cake recipes, which I am going to try soon. The reason is I got the Whipped cream powder which was not available all these days. Its a wonder powder. Just add some chilled water and whip it with the blender. Wooo... you have a yummy whipped cream...
I am not sure about the reason why my cake was hard, may be it was more baking powder or old baking powder, I felt its not that soft.. may be will try soon again to find out the mistake.

The recipe is here: (I have edited it according to my taste)
Ingredients:
Cocoa powder - 1/8 cup
APF - 1/4 cup
Eggs -2
Sugar(Granule) - 1/4 cup
Baking powder - 1/2 tsp
Baking Soda -  a pinch
Hot water 1 tbsp(If required)
Vanilla essence - 1 tsp
Sugar syrup - 1/8 cup to soak the cake(mix equal qty of water and sugar and mix well)
Whipped cream - 1 cup
Cherries-  1/2 cup, one boil, remove seeds. Chop few cherries to spread and keep few cherries full to decorate.

Method :

  • Whisk egg, sugar and vanilla essence over hot water till custard consistency. 
  • Add Sieved APF, cocoa powder, baking powder and a baking soda.
  • Mix it. Add little water. Mix and cut. 
  • Put in a greased and dusted 6inch tin and bake in a preheated over at 180 degree for 30 minutes. RElease sides. Remove and cool.
  • Cut in to 2 equal halves with a thread and soak with sugar syrup.
  • If you have a ready whipped cream thats fantastic., or if you have whipped cream powder prepare the cream by adding water and keep it ready in the refrigerator for half an hour.
  • Now
  • take the first half of the cake.  Apply the cream, Spread chopped cherries. 
  • Keep the second half of the cake on it. Soak with sugar syrup. Apply the cream again. 
  • Decorate with the cherries and grated chocolate(I did not had chocolate :-(  )
  • Keep in the fridge for sometime before you serve.


Sending it to the ongoing event 
Which is started by ME.

Celebrate Sweets - Cakes


Keep Baking :-)))


Keep Smiling,

Tuesday, June 28, 2011

Vegan Mango Cake(Food Remake)

Tried and tasted by Nivedita
Hi All,
Two years back....
I was scared of baking. The word itself made me sweat.. I never thought that I will start baking one day.
But there is always first step and we learn to walk only when we start that first step and keep on falling down and getting up again. Each fall is a lesson for us to keep the next step carefully. This is what happened with me here.
There are many times that I have wasted the whole cake, I have felt bad for the money I spent for the ingredients and taken oath that I will never bake the cake :-),. But every oath ended within 7 days. Again I had tried and again another failure...
But, now, may be I will not be a great baker or can get a job in baker's cake.. but definitely I can bake a cake which my kids love to have. I can bake a cake for my kid's small parties..
Here is my Nth number of cake... This also was a failure because I used Rice flour instead of APF..
When  I am talking about the cakes and bakes,, I would love to thank many bloggers here, who are my inspiration to keep my baking fire on in my mind..
(It definitely doesn't mean that  other bloggers are not my inspiration, but when it comes to baking, I just love to dig into these blogs and every time I have got perfect recipes. It is me who is not good at baking.) How can I forget the tips by Aparna S Mallya on how to preheat the oven before we start baking and few more. Thanks dear.
Champa of  Versatile Vegetarian Kitchen
Suma of   Cakes And More!
 Raaga of The Singing Chef 
Ria of  ♥Ria's Collection♥  and
Deeba of Passionate About baking
I don't know when will I reach their level!!!!!...
Thanks all for the great help.. You all are my teachers.
Coming to today's cake,
I have followed the recipe from Champa. :-), I think I mailed her several times with many dumb questions,before I baked this cake, and even after I baked these. But each time, she replied me promptly and with proper solution. Thanks dear.
You know that first time it was a disaster as I used rice flour.. But again I tried baking it and it came out very nice.. I enjoyed each bite..
This was the disaster cake which I prepared using rice :-))))

Click  Vegan Mango Cake for the original recipe

Sending it to the ongoing event 
Which is started by ME.

Celebrate Sweets - Cakes


Keep Smiling,

Friday, June 17, 2011

On Break...

Tried and tasted by Nivedita
Hi All,
How are you all?
Sorry for not posting regularly.
I will be back soon. Busy with the work at home...
Hope to see you all here when I am back.....

Keep Smiling,

Wednesday, June 15, 2011

IYENGAR BAKERY KHARA BISCUITs for ICC May

Tried and tasted by Nivedita
Hi All,
Every month,  is getting more interesting, I am enjoying it and wait for the announcement every month. Sometimes, I will finish the challenge soon and its really difficult to wait for 15th of that month.
I prepared these biscuits which Srivalli has choosen from Champa's Savory Shortbread cookies / Iyengar bakery Khara Biscuit for Indian Cooking Challenge.
The very next day I prepared these and was waiting for the 15th. Here I am with my version. 


I remember mom making biscuits like these. But she had that old round, big oven like a round tiffin box. She always tried biscuits, buns, breads and cake in that. I never tried with her :-(, but here I am getting very challenging and fare chances of learning many new foods. When you are in challenge, you will do it.
That holds good with me..


Ingredients :(I used half the qty from the original recipe, it gave me more than 30 biscuits)
All purpose flour - 1 cup
Butter - 1/2 of 1/3 cup(I had fresh home made butter :-))  )
Green chilly - 1
Yogurt or curds - 2 TBSP
Sugar - 2 tsp
Salt to taste
Fresh coriander, Curry leaves and Fresh mint - 1/4 cup, finely chopped


Method:
Line the baking tray with baking sheets.
Preheat the oven at 160C
In a bowl, mix nicely the APF and salt. 
In another vessel, beat the butter and sugar till creamy. Add the yogurt and continue the beating.Add the dry ingredients. Keep on mixing without much pressure on your hands.
Add the green chilly, and green leaves chopped. Mix well. the dough will be dry. Don't add more curds or water to make it wet.
THE DOUGH SHOULD BE CRUMBLY.

Take half the portion and make into a ball. Roll into 1/4" thick chapati.
Use the Cookie cutter if you have to give the desired shapes or you can use some steel bowl with sharp edges, or bottle cap or even the normal knife to cut these to give any shape.
Transfer these on baking sheet slowly.
Bake for 18 to 20 minutes. Keep checking of getting burnt. My biscuits took 15 minutes to bake. 
They will be soft when hot. But will turn into crispy once cool.
Store in a air tight jar.
This is the last portion left out after cutting with the cookie cutter ;-)
My daughters enjoyed the biscuits with their friends. Planning to bake it again.

Keep Smiling,

Wednesday, June 8, 2011

Chinese Menu in my kitchen

Tried and tasted by Nivedita
Hi All,
What ever happens is always for the good, the most famous lines from Geeta. And I believe in it very much.
It happens with me always. Thats the reason many times I don't get panic if something goes wrong. The same thing happened with me last week. One of my best friend came to meet me. It was first time she was coming to our Hubli house. Our friendship is almost 18 yrs old. We were meeting after 4 years. It was natural for me to get excited and was planning for some special menu. When I asked her in the phone What she wants to have, she preferred our North Karnataka food but her daughter wanted Chinese when I gave her the option. Thats why I planned for Chinese menu for my friend and her daughter. Now to plan a menu was not difficult. I thought of making Chinese fried rice, Schezwan noodles and Chilli Paneer.
Thought of bringing fresh paneer(was lazy to make paneer).
   And morning I went to the near by store (MORE) and the store was closed for stock checking :-(((
I had the ready masala packet for chilli paneer, so thought of making veg balls instead of Paneer.
This is what I served to my friend and her daughter :


So here goes the recipe For Veg Chilly:


Ingredients:
Cabbage - 1 cup, cleaned and shredded
Carrot - 1 medium, cleaned and grated
Cornflour - 3 to 4 tbsp
Red chilly powder - 1 tsp
Ginger and garlic paste - 1/2 tsp
Salt to taste
Oil - 1 tsp
Oil to fry the balls.

for Gravy
Oil - 1 tsp
Onion  - 1, sliced
Cabbage - handful, shredded
Capsicum - 1 small, sliced(optional as the Schezwan powder is very spicy)
Ginger and garlic -1 tbsp  finely cubed,
Spring onion - handful, finely chopped( I did not had)
Ching's Chilli Paneer Miracle Powder - 10 gm
Salt to taste.
Water - 2 cups
OR
JUST FOLLOW THE INSTRUCTION GIVEN ON THE PACKET.

Method:
To make Veg. Balls,
Mix all the ingredients in a bowl, except the oil to fry.
Keep oil in a frying pat on stove.
Till the oil becomes hot,
Divide the mix into equal small lime size balls.
Fry in a batch till golden brown.
Keep it aside.

For gravy:
Heat oil in a kadai. When its very hot, add ginger and garlic, saute for few seconds. 
Add onion and fry till the color is changed. Add Cabbage and capsicum. Fry for a minute more.
Add the water and bring to boil. 
Adjust the seasoning. Add the veg. balls and spring onions. 
Cook for 2 minutes,
Serve hot with Rice or Noodles.

My Chinese recipes from my kitchen :(These are not actually for the event, as the rule of the event says NO archived or reposted recipes, its just for people who wants to get all the three Chinese recipes from my blog, I hope this will not violate the event rules)
Chinese Fried Rice(Restaurant STyle)                        Hakka Veg. Noodles with Ching's SECRET


Sending the Veg Chilli to Radhika's event

Keep Smiling,

Search This Blog

Lijit Ad Wijit

My Shelfari Bookshelf

Shelfari: Book reviews on your book blog